March 9, 2010

"Mom Tattoo"


I found this great idea from Mary Janes & Galoshes, and I thought Peyton just HAS to have one!


I made mine exactly the same way, usuing her template from the Girls Mom Tattoo Clip.


I cut out two hearts and one of each banner piece. I sewed them together and then sewed on the "MOM" part. For me, I wanted Peyton to wear this on any outfit, not just one specific shirt. So, I saftey pinned it on to his Blue Jeans Coveralls. This is so adorable!! I can't wait to make more!


February 23, 2010

St. Patrick's Day Wreath

I decided to make a St. Patrick's day wreath this year being that I don't have one darn decoration for dear St. Patty's day!? What the heck!? I must make more!!! hehe
I started this wreath by purchasing a Styrofoam circle wreath from Michael's. I wanted to check out the dollar store but I didn't have time. I bought this one for $6 bucks. I had so many left over "brown lunch bags" from making my mulling spice bags that I thought I would somehow put them to good use!
I cut out different size wavy like circles out of the lunch bags. I folded the lunch bags in 3's so this went by faster- cutting three out at a time.

Next, I glued the wavy circles to the Styrofoam wreath. Using the end of the pencil, I paced it in the middle of the circle, applied Hot Glue ( my crush ;) to the opposite side and stuck it to the wreath! I filled my wreath the max, making it appear MUCH larger :)


I cut out Shamrocks on to two different green patterns. Hot glued the shamrocks on to the brown paper bag circles. Tied a beautiful thick bow on... and Ta- Da! Done!!


February 14, 2010

Easy Valentine's Day Cookies

These cookies are so good and yet so easy to make!! I started by making my favorite sugar cookies and chilling the dough overnight in the fridge. I use Martha Stewart's cut out sugar cookie mix. ( I used a heart shaped cookie cutter)


After the cookies are baked and have cooled. I call this the "cheat" frosting. I took ONE can of Pillsbury strawberry frosting or use whatever flavor/color you like ( remember you can
always add any food color). I melted the entire can in a bowl for 30 seconds. Dip the cookies in and sprinkled right away!


Let the cookies dry and Ta Da!!


February 11, 2010

Large Valentine's Day Banner

Well here it is, Banner 2 of 2 ;) This was a fun banner to make, and I am in love with it!

I started with buying a pack of 10 heart shaped doilies from the Dollar Tree! Yes, the Dollar Tree! I bought a pack of Red and a pack of white.

I used my stencils and drew out the letters, B E M I N E. I then traced the letters onto the hearts, alternating colors.
After that, I cut the letters out, leaving a "window" of the letter. Place the opposite color doilie behind the doilie that has the letter cut out, and glue together (Using a Glue Stick)!

Punch two holes at the top and lace the doilies through. I hung my banner on our family room wall up on the pole. My letters are not moving at all, but I am noticing that the lette "E" is curling inward. I am simply going to glue the edge of that doilie to the ribbion to flatten out!

Whoa Lah!


Love Clips for the Cup

Just like I said " Love Clips for the Cup" that's exactly what I made! Andy and I are having a little Valentine's Day Party this year, so I guess in all honestly this is what sparked my motivation for making and creating so many Valentine's Day decor this year.... okay let's face it, I probably would have done this anyway! :)


I wanted to make some kind of clips for everyone to clip onto their cups.


I started with HARD Red & White Felt (not the soft, flimsy kind) I used a cookie cutter to trace the hearts and then cut them out.


Using a hot glue gun ( my secret crush) I glued on a clothes pin to the back of each heart. After learning as I go, be sure to glue the clothes pin closer to the BOTTOM of the hearts, this way you'll have room to hole punch a hole above the clothespin. As you can see below, this is exactly what NOT to do :) The clothespin is way to far up to punch any hole through! :O


I then cut out hearts from plain white and red paper. Side note, I again folded the paper in half and cut free hand hearts ( they will have a slight crease down the middle). On each paper heart I wrote out Love words, if you will :) Not cute, but sexy words instead! After all, this is an adult only party! :)


Lastly, I punched my holes through the felt and paper hearts together and tied a ribbon through the hole to hold the hearts together! Alternate by using red on white and white on red.


Kitchen Lamp Banner Strings

This banner was made at the very last minute! This also only takes about 5-10 minutes to make!! Added a touch of love to my kitchen in minutes :)

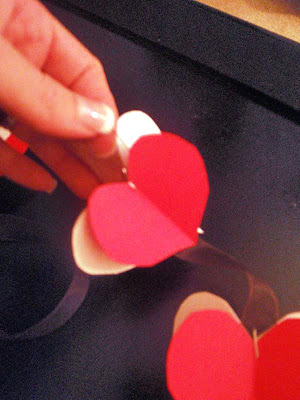
Start by cutting hearts out of any color paper, I used Red & White. I folded the paper with a crease and cut free hand hearts ( This way the hearts all have a crease right down the middle).


I then took two pieces of long ribbon ( I used a light brown, thin ribbon).

Placing a white heart on one side of the piece of ribbon and a red heart on the other side of the ribbon ( up against one another, back to back) I stapled the hearts to the ribbon.


I left only about 2 inches between sets of hearts.


Next hang the ribbons around your lamp! I also added a little touch and added bows to the ends of all 4 strands with staple! I love my bows!


Petite Love Banner

Okay, I must admit... I LOVE V-day! No matter what the situation is, it just feels as though more Love is in the air and people are wearing more smiles on this day!

I wanted to bring some love into our home with some cute Valentine's day decor! So here you go!

Banner 1 of 2 ;)

I started this banner by tracing a bunch of hearts by using a FREE heart template on google.

I cut out hearts on all my Red, Pink and White scrapbook paper, not even card stock, just regular! I got a little crazy and went with pinkish design paper!

I then punched two holes through the tops of all the hears, and laced a piece of ribbon through all the hearts, alternation the color of hearts. I made this banner as long as my bathroom mirror is. Next, I cut out free hand X & O's (just 2 of each). With a glue stick, I glued the letters onto the middle hearts, reading " X O X O". Lastly, I hung the banner! With just a little scotch tape ( hiding the tape behind the end hearts). I tied on two red bows to the ends and called it a day!


"Bear Hugs"

Being that "Love is in the Air" and it's almost Valentine's Day.. I thought I'd go ahead and get started on Peyton's P.E.S.T. gifts! ( P.E.S.T. means a secret Teacher appreciation person) Peyton has 3 P.E.S.T. teachers to whom we make gifts, cards, treats etc. for. We appreciate what ALL the staff does at his school.

I saw this CUTE idea from On Tulip Trail , I had to make my own!

I started with purchasing 3 jars from the Good ol' Dollar Tree! Hey, what can I say they were only a buck each! I wanted to use actual glass jars, but I couldn't find any at the time at Goodwill. Plus, being that my son is in the infant/toddler room, I would hate for the teachers to drop them and break in the classroom! Eeek!


Next, I bought 2 bags of Hershey's Hugs and 1 box of Teddy Grahams.
(This is pending on how big your Jars are, and how full you want them!)


It's Easy Peasy from here! I filled my jars, with bears on bottom and Hugs on top.

I made little tags for each jar, hole punched the corner and tied on a cute Valentine's ribbon.


...and Ta-Da, You're done!! Cute and EASY!! :)


February 1, 2010

Valentines' day Germ Fighters

This has truly been one of my favorites! The germ freak that I am, these were right up my alley! A girlfriend at work told me about this idea and I came up with my "own" touches to make it a bit unique!
This is VERY affordable, cute and even fights germs!! :)
I picked up hand sanitizer bottles at the dollar tree,
the most important tip I can give, is to be sure that there is nothing actually printed on the front of the bottle! You need to
remove the label, and if need be use goo-gone or soap and water to remove all the adhesive. Once removed, its simple- decorate!! I use black swirl and valentine decals that I had from my
scrapbook
collection!! I added silver puffy paint as well. I tied different colored red ribbons on each bottle, giving it its own touch. These are fun to make, but best of all helpful for Peyton's teachers!


January 30, 2010

Ribbon Organization!

For so long I have been trying to come up with some sort of ribbon organization system for my wild collection! I have a freezer bag full and a small box (has some organization, but its way too small) While browsing I found the best idea and after adding my own style, its awesome!!! Here is Peyton showing you the before... yes a true mess, I know!


I started with a pants hanger I already had actually hanging in my closet, and I don't use! I cant stand to hang my pants on! So, this worked out perfectly!


I then simply put the rolls of ribbon onto the hanger! In my case I had alot of "extra" loose ribbon not on a roll, with these I tied the pieces onto rubber bands and hung them to the hanger.


Finally, here is the finished product.... so much BETTER!!


Blog Template by Delicious Design Studio